The article explains the Karnaugh Map (K-Map), a graphical method for simplifying Boolean expressions in digital logic design. It discusses the K-Map’s structure, its application for 2-, 3-, and 4-variable problems, techniques for grouping adjacent cells, and utilizing “don’t care” entries for further simplification of logic functions.
An alternative to the truth table to determine and simplify the logic function for an application is Karnaugh map (K-Map), named after its originator Karnaugh. Karnaugh map abbreviates to K-map offers a simpler solution to find the logic function for applications with two, three, and four inputs. Its application to cases with a higher number of inputs is possible but difficult to tackle.
What is a Karnaugh Map (K-Map)?
A Karnaugh Map (K-map) is a graphical tool used in digital logic design and simplification of Boolean algebra expressions. It provides a systematic method to simplify logical expressions, reducing the number of terms and operations required to implement a logic circuit. The K-map organizes the truth table into a grid-like structure, grouping together combinations of input variables that differ by only one bit, which helps in identifying common factors.
Key Features of a Karnaugh Map (K-Map)
Structure __ The K-map is a grid-like representation of truth tables. For an n-variable Boolean function, the K-map consists of 2n cells, each representing a unique minterm (a combination of input values where the output is 1).
Arrangement __ The cells are arranged in a way that adjacent cells differ by only one bit (Gray code sequence). This adjacency facilitates combining terms with minimal differences.
Simplification __ By grouping adjacent cells with the same output value (usually 1), the K-map identifies terms that can be combined. This helps in reducing the Boolean expression.
Adjacency __ Cells on the edges of the map are considered adjacent to corresponding cells on the opposite edges (wrapping around), ensuring all possible simplifications are considered.
2-Variable K-Map Example
Applications with only two inputs A and B are easy to handle by any method. For easier understanding of how a K-map works, nevertheless, we start with two inputs. As you have noticed, with two inputs there are four possible states, as shown in the truth table depicted in Figure 1, which also shows the corresponding K-map.
For a two-input problem, the K-map has four cells. The horizontal cells represent the two states of one of the inputs (B in Figure 1, starting from $\overline{B}$ on the left), and the vertical cells exhibit the states of the other input starting from the NOT value. The correspondence between the truth table lines and the K-map cells are shown by arrows for two cells.
The required values for the output are entered in the corresponding cells (Figure 1b). For example, in the figure shown, it is required that the output be 1 in the two cases: $\overline{A}\overline{B}$ and AB; that is when both inputs have their complement values, and when both inputs have their 1 values, or in other words, when the two inputs have similar values. (Note that for simplicity the multiplication symbol is not shown; thus, AB denotes A.B.) The arrows show the corresponding transfers. The other cells are required to be 0’s in this case. Thus, they are filled with 0’s.
Each cell represents one of the four combinations of the two inputs. For example, the top left cell represents $\overline{A}\overline{B}$. This is the logic expression for that cell.
When the cell values in the K-map are identified based on the output requirement and the 1’s and 0’s are assigned, the logic expression can be derived from the cells containing ones. The sum of the expressions for those cells with 1 inside defines the logic function for the application. In the present two-input example the expression for the output Z is
$Z=\overline{A}.\overline{B}+A.B$
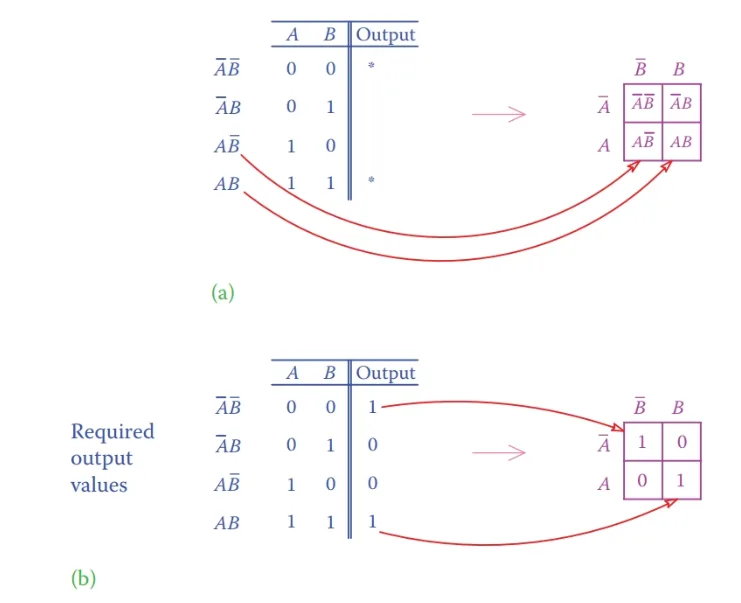
Figure 1 Truth table and K-map for a two-variable example. (a) Structure of the K-map. (b) Example of implementation of requirements.
This is the expression for the complement of an XOR gate. So, for this application, the required circuit consists of an XOR gate and a NOT gate. For this problem, it was not necessary to use a K-map because it is a trivial case of two inputs. But, for three and four inputs the problem is more involved.
One important property of a K-map is that moving from any cell to a neighboring cell implies only one change (and never more than one). One change means that only one of the inputs switches to its complement. You can see that for two-input K-map moving horizontally changes B, only, and moving vertically changes A, only. This property helps to select the correct entry for extension of the two-input K-map to three and four inputs, as can be seen next.
Also, take note that in K-map notation all cells have two neighbors vertically and two neighbors horizontally. In other words, the cells are assumed to be seamlessly organized in circles and not in rows and columns. This matter is more important and clearer for three and four inputs and will be visited again.
3-Variable K-Map Example
The K-map for two inputs can be extended to three inputs by combining the third input either in the horizontal or vertical direction with the input already placed there. Here we do that horizontally, and the third variable C is combined with B, as it is shown in Figure 2.
The K-map for three variables has eight cells, each one of which represents one of the possible eight combinations of three inputs. In Figure 2 the cells are numbered from 1 to 8 for reference.
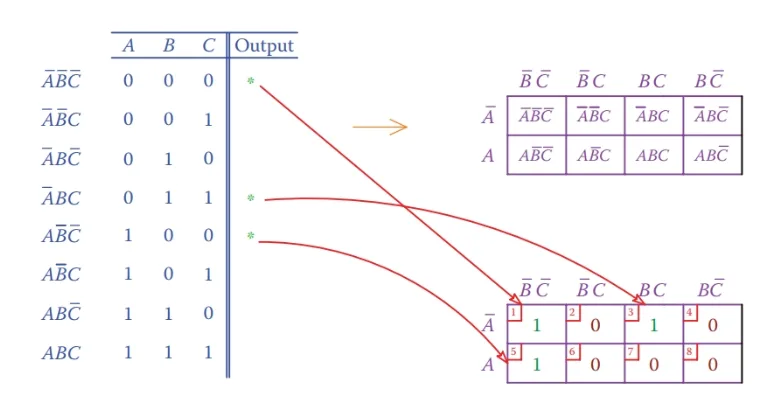
Figure 2 K-map for a three-variable example
Note the following important points:
1. Each cell represents the combination of three inputs. Thus, the expression of the function for each cell is the product of inputs or their complements like $\overline{A}B\overline{C}$.
2. Variation of the two inputs is reflected in the horizontal direction.
3. In the horizontal direction moving from each cell to its right or left neighbor implies a change only either in B or in C but not both. This is why in the third column from left BC appears and not $B\overline{C}$.
On the basis of the requirement for output, as shown by the asterisks in the truth table, 1’s are entered in the corresponding cells in the K-map. The rest of the cells are filled with 0’s.
The essence of a K-map now can be shown based on the pattern that appears after all cells are filled. Both cells 1 and 5 (in Figure 2) must be selected as part of the output. Cell 1 contains $\overline{A}$, and cell 5 contains A. This implies that changing A to $\overline{A}$ (and vice versa) does not have any effect on the output, meaning that no matter what input A is the output is independent of it. In such a case the output is defined by the common part of these two cells, plus any other cell that contains 1. For this case,
$Z=\overline{B}.\overline{C}+\overline{A}.\overline{B}.C$
The process of definition and simplification of the logic function by using a K-map is as follows.
1. Encircle all occurrences of 1’s in the cells putting together all those in the neighboring cells in groups of two and four. The neighboring cells can occur in a row, column or rectangle when more than one column (or row) is involved.
2. Write the corresponding expression for each encircled group.
3. Add together the logic expressions for all groups.
For step 1, one should pay attention to the fact that moving from cell 4 to cell 1 (or vice versa) and from cell 8 to cell 5 implies only one change; it is a switch between B and its complement. In this respect, cells 1 and 4 are considered neighbors, and cells 5 and 8 are also considered neighbors. Thus, they must be encircled together if they contain 1’s.
For step 2, note that a row change implies a switch between A and its complement, a change between the first and fourth column implies a switch between B and its complement, and a change between columns 1 and 2 and between columns 3 and 4 implies a switch between C and its complement (see Figure 3).
We try to form groups of two or four, whenever possible. For each case, the variable(s) that do not change within the group describe the logic function for that group.
Forming groups is the process of simplification of the logic function for an application. Examples of forming groups and encircling neighboring cells are shown in Figure 3. The corresponding logic function for the cases shown is described below. More examples are shown in the next section for four-input problems.
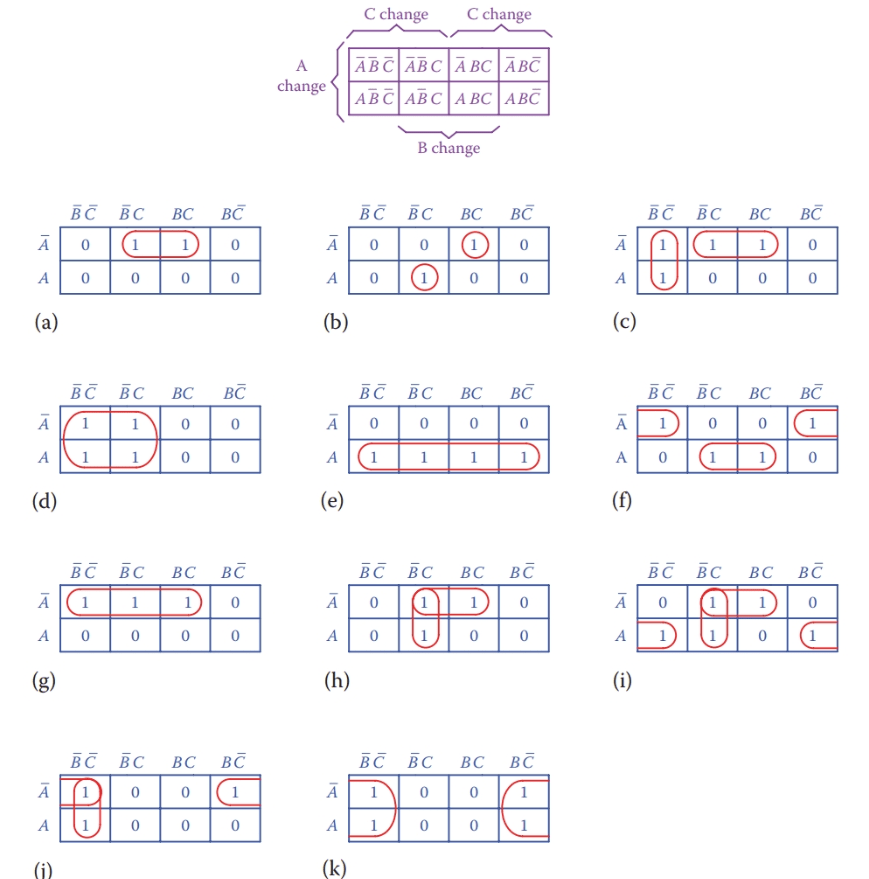
Figure 3 Examples of encircling neighboring cells containing 1’s in a three-input scenario. (a) Only one group. (b) No grouping is possible. (c) One vertical and one horizontal group. (d) One group of four cells in two rows. (e) One group of four cells in a row. (f) Extreme cells in a row make a group. (g) In this case, there are one pair plus one cell, or two pairs with a shared cell. (h) Two groups, one horizontal and one vertical. (i) Three groups. (j) Two groups. (k) One group of four cells.
The logic functions for cases a to k illustrated in Figure 3 are as follows:
a. The encircled cells belong to $\overline{A}\overline{B}C$ and $\overline{A}BC$ . That is, the output is defined by the sum of $\overline{A}\overline{B}C$ and $\overline{A}BC$. Because a change of $\overline{B}$ to B has no effect on the output (which is shown by having 1 in both cells), then they are removed and the output is defined by
$Z=\overline{A}C$
b. The individual encircled cells do not have any common element. The output is, thus, the sum of these two cells.
\[Z=\overline{A}\overline{B}C+A\overline{B}C\]
c. Although a cell can be shared between the two encircled areas, it is better to divide the cells containing 1’s to two groups each one containing a pair of cells.
$Z=\overline{B}\overline{C}+\overline{A}C$
d. All the encircled cells have $\overline{B}$ in common and change in A and C do not have any effect. The output is only defined by $\overline{B}$.
$Z=\overline{B}$
e. Similar to case d, all encircled cells contain A, and changes for B and C have no effect on the output.
$Z=A$
f. There are two encircled pairs in this case; one corresponds to no change in $\overline{C}$ (it exists in both cells) and the other one implies no change in C.
\[Z=\overline{A}\overline{C}+AC\]
g. When three cells are involved, as encircled, we can consider two pairs with one shared cell. For the first pair,$\overline{B}$ does not change, and for the second pair, C does not change.
$Z=\overline{A}\overline{B}+\overline{A}C$
h. For this case, again, we consider a horizontal pair and a vertical pair (one cell is shared between the two). For the horizontal pair, B changes (thus, its function excludes B) and for the vertical pair A changes (so, A is omitted).
$Z=\overline{A}C+\overline{B}C$
i. This case can be considered a combination of that in case h plus an additional term for the cells 5 and 8. Thus,
$Z=\overline{A}C+\overline{B}C+A\overline{C}$
j. The cells 1 and 4 lead to $\overline{A}\overline{C}$, and the cells 1 and 5 lead to $\overline{B}\overline{C}$; therefore,
$Z=\overline{A}\overline{C}+\overline{B}\overline{C}$
k. All the encircled cells contain $\overline{C}$, and changes in A and B do not play a role.
$Z=\overline{C}$
4-Variable K-Map Example
The K-map for four variables has 16 cells; that is, twice as many as that for three variables. As was done for the horizontal extension from the two- input case, both horizontal and vertical extensions are implemented. The result is shown in Figure 4.
Each cell in this case reflects the value corresponding to one of 16 possible states for combination of four inputs. The logic function of each cell is composed by multiplying (AND’ing) the logic expression of the row and the column in which it lies. For example, ABCD corresponds to the third row (AB) and the third column (CD).
Simplification is done in the same manner that was described for the three-input problem. We try to find groups of two, four, and eight neighbor cells that share the same variable(s). Those variables then define the logic function for the group. Figure 5 illustrates a number of examples, whose logic functions are as follows.
a. The four encircled cells are independent of each other, and they cannot be grouped. The output, thus, is the sum of all four of them.
\[Z=\overline{A}\overline{B}\overline{C}\overline{D}+\overline{A}\overline{B}CD+\overline{A}B\overline{C}D+\overline{A}\overline{B}C\overline{D}\]
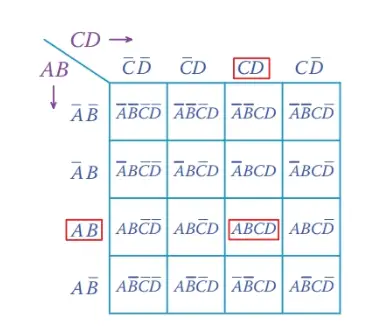
Figure 4 K-map for a four-variable example.
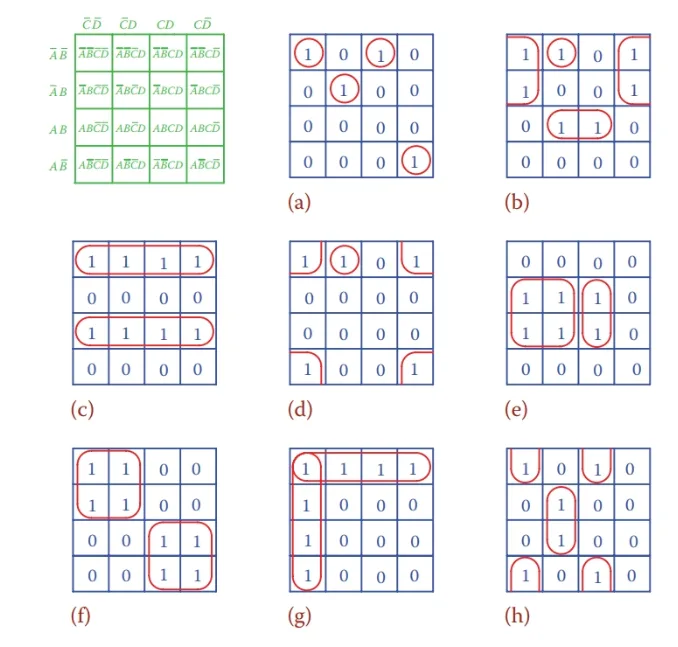
Figure 5 Examples of four-variable K-maps.
b. There are three groups, part of column 1 and 4, the individual circle, and the two in the middle.
\[Z=\overline{A}\overline{D}+ABD+\overline{A}\overline{B}\overline{C}D\]
c. The function of a row or column is always that written in front of the row or on the top of the column. Thus,
\[Z=\overline{A}\overline{B}+AB\]
d. All the 1’s in the four corners can be grouped together. The only two variables that do not change are $\overline{B}$ and $\overline{D}$. The individual cell is $\overline{A}\overline{B}\overline{C}D$ .
\[Z\text{ }=\overline{B}\overline{D}\text{ }+\overline{A}\overline{B}\overline{C}D\]
e. A group of four and a pair can be identified here.
\[Z=B\overline{C}+BCD\]
f. Two independent groups exist. In the top group, change of B and D does not play any role; in the bottom one, again, change of B and D with no effect is involved. Therefore,
$Z=\overline{A}\overline{C}+AC$
g. This case is similar to case c with the exception that the two groups share one cell, but that does not affect the result.
\[Z=\overline{A}\overline{B}+\overline{C}\overline{D}\]
h. The answer based on the three pairs of cells forming three groups is
\[Z=\overline{B}\overline{C}\overline{D}+B\overline{C}D+\overline{B}CD\]
Don’t Care Entries
The entries of a K-map are not always 1’s and 0’s. The application requirement determines those cells that must contain 1. Some of the cells also must contain 0 as a requirement, but, also, it can happen that for certain cells the content either is not defined or its value is immaterial. In such a case, it does not matter if a value of 1 or 0 is assigned to the cell. For a case like this an X is entered in the cell instead of 1 or 0. An example is shown in Figure 6a. These cells are called “don’t care.”
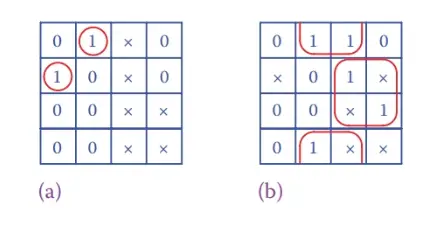
Figure 6 Benefitting from do not care entries. (a) All X’s are considered 0 and do not appear in the output. (b) In order to group with 1’s, some X’s are considered 1.
One can benefit from the “don’t care” entries in simplifying the logic function. This advantage is not available in the example in Figure 6a. On the contrary, in the example shown in Figure 6b, the logic function can be quite simplified if certain of these “X” cells are assumed to contain 1. One option, based on the encircled groups as shown and according to the definition of cells in Figure 4, is
\[Z=\overline{B}D+BC\]
Karnaugh Map (K-Map) Key Takeaways
The Karnaugh Map (K-Map) plays a crucial role in simplifying Boolean expressions, which directly impacts the efficiency and reliability of digital logic design. By reducing complex logic functions into simpler forms, K-Maps help minimize the number of logic gates required in a circuit. This leads to lower power consumption, faster processing, and cost-effective implementation—factors that are critical in designing hardware for computers, embedded systems, industrial automation, and consumer electronics. Additionally, the ability to handle “don’t care” conditions makes K-Maps highly adaptable in real-world scenarios, where flexibility in output logic is often needed.